Web application performance is one of the most important topic nowadays. Most of us create application that have to be fast not only on desktop but also on mobile devices. Mobile network is slow and this causes that we have to think about performance constanly. One of technique that we can apply in our application to make it faster is HTTP caching. I'm going to show you how we can use this technique in Rails application.

HTTP Headers

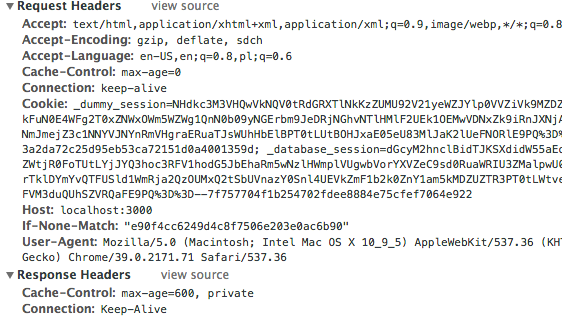
Browser and server are really talkative and they like to share knowledge about web pages and other resources. During every request and response, browser and server exchange data as HTTP headers. HTTP header contains the name of the header and its value (string). The easiest way to check the headers and theirs values is opening the developer console in a browser (in Chrome you can find them in Network -> Headers tab):

HTTP headers in the developer console

The headers which are interesting for us are:

  • Last-Modified (response header) and If-Modified-Since (request header)
  • Etag (response header) and If-None-Match (request header)
  • Cache-Control (response header)

Let's look at them separetly.

Last-Modified/If-Modified-Since

Let's say that browser asks server for page first time (we never visit the page before). Server sends the response (for example generated HTML page) with status 200 and it can also set HTTP header: Last-Modified. This header should contain the date of last modification of the page:

the example of Last-Modified HTTP header

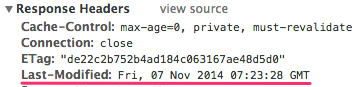
When browser finds this header in the response, it gets the header's value and caches it. When the browser asks server second time for the same page, it sends this cached value in the HTTP header: If-Modified-Since

the example of If-Modified-Since HTTP header

This way browser asks the server: "Is the page being modified since the last time I saw it?". When server finds the If-Modified-Since header in the request, it can compare the value from the header with last modified value for the page. If they are the same, the server sets response status to 304 and it sends to browser empty response body. When the browser gets reponse with this status, it renders the page from cache.

What are the adventages of this behaviour? First and foremost, we decrease the response bandwidth, as with 304 status, server sends to browser empty body in response. This, of course, makes page rendering faster. The second adventage is that we control browser cache. The third is that we might reduce view rendering on the server side, but this is not the default behaviour that Rails provides us. We have to do some settings by ourselves. I'll talk about later in this article.

As always there are also disadventages: the browser can't decide without server that it can take page from cache. So the browser always have to make request to server, which, again, takes time.

ETag/If-None-Match

The way how these pair of HTTP headers works, is similar as described above. The difference is that, when browser asks server for a page first time, the server sends ETag HTTP header. The header contains the hash (md5) from page's HTML:

the example of ETage HTTP header

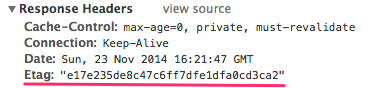
The browser caches it and when asks server for the page again, send this cached value to server in If-None-Match HTTP header. This way the browser asks server: "I have this version of the page. Is is still the same?". The server compare hash from the request header with the new one, generated from the actual page content. If they are the same, the server sets 304 status on response and clears body content in response. Otherwise, the server sets 200 status and sends back HTML page in response body.

The pros and cons usege of these headers are exacly the same as with Last-Modified/If-Modified-Since headers.

the example of If-None-Match HTTP header

Cache-Control:max-age

Cache-Control is the header which is sends in the response by the server. It contains different keys (sometimes with values), separated by commas. In this header the server tells browser how long the page (or other resource) will be actual:

the example of Cache-Control HTTP header

This header has big advantage compares to other ones. Here browser has knowledge how long the page is actual, so the browser doesn't have to request the server. The browser can take the page from cache immediately, so this is super fast!

The cons is that in many situation is hard to estimate the time how long the page should be valid.

Ok, so now we know how these HTTP headers work. Let's see how Rails helps us to use them more easily.

Rails, as usual, does a lot by default!

Rails has by default two middlewares that helps with ETag/If-None-Match headers:

  • Rack::ETag
  • Rack::ConditionalGet

When you run

rake middleware

you can see them up to the bottom of middlewares stack. Let's dig into source code of this middlewares and understand how they work. You can find the code in rack gem. So let's open it. In your console, go to the directory with Rails project and run:

bundle open rack

Sidenote: if you are using Sublime text, you can open any gem from editor with this plugin: https://github.com/NaN1488/sublime-gem-browser.

rack is the gem that is installed with rails gem. When you open the gem in an editor, go to lib/rack directory and open etag.rb file. The important is call method, which is called when request/response goes throught middleware stack.

 1 # gem rack - lib/rack/etag.rb
 2 def call(env)
 3   status, headers, body = @app.call(env)
 4 
 5   if etag_status?(status) && etag_body?(body) && !skip_caching?(headers)
 6     digest, body = digest_body(body)
 7     headers['ETag'] = %("#{digest}") if digest
 8   end
 9 
10   unless headers['Cache-Control']
11     if digest
12       headers['Cache-Control'] = @cache_control if @cache_control
13     else
14       headers['Cache-Control'] = @no_cache_control if @no_cache_control
15     end
16   end
17 
18   [status, headers, body]
19 end

In the line 6, digest from response body is created. If you look into digest_body method, you can see that Rack::Etag class uses md5 algorythm to generate it. Next, in the line 7 - header ETag is set. So this middleware sets up the ETag header for us.

Let's see what Rack::ConditionalGet buys us. You can find source code of this class in lib/rack/conditionalget.rb file:

 1 # gem rack - lib/rack/conditionalget.rb
 2 def call(env)
 3   case env['REQUEST_METHOD']
 4   when "GET", "HEAD"
 5     status, headers, body = @app.call(env)
 6     headers = Utils::HeaderHash.new(headers)
 7     if status == 200 && fresh?(env, headers)
 8       status = 304
 9       headers.delete('Content-Type')
10       headers.delete('Content-Length')
11       body = []
12     end
13     [status, headers, body]
14   else
15     @app.call(env)
16   end
17 end

In the line 6, it checks if the response status is 200 (so we have success). The second condition (fresh?(env, headers)) checks if the the pairs of headers Last-Modified/If-Modified-Since and ETag/If-None-Matchmatch each others. If so, (in the lines from 7 to 10), the status is set to 304, HTTP headers Content-Type and Content-Length are removed and the response body is cleared. As we can see this middleware is responsible for setting 304 status and clearing body, if the browser has actual content for the page.

So you can think right now: "Rails do all the hard work for me. So why to bother this topic, except that good to know how it works?". The thing is that we can go step futher and make it better. As I mention earlier, when we generate ETag/Last-Modified we can also reduce view rendering on the server side. Let's see how we can make it.

stale?/fresh_when methods

In controller's class, Rails gives us two instance methods:

  • stale?
  • fresh_when

Above methods allow us to easily generate Etag and Last-Modified headers on the application level. Let's see how we can use them.

Varbose example of stale?

1 def show
2   @book = Book.find(params[:id])
3   if stale?(last_modified: @book.updated_at, etag: @book)
4     respond_to do |f|
5       #standard rendering
6     end
7   end
8 end

We can also use shorter form of stale?

1 def show
2   @book = Book.find(params[:id])
3   respond_with(@book) if stale?(@book)
4 end

fresh_when works in different way. Verbose example:

1 def show
2   @book = Book.find(params[:id])
3   fresh_when(last_modified: @book.updated_at, etag: @book)
4 end

and concise example:

1 def show
2   @book = Book.find(params[:id])
3   fresh_when @book
4 end

Now lest look closer how these methods work. Both of them take hash as an argument.

last_modified - the value of this key will be the value of Last-Modified header. So it must be a datetime. etag - not surprisingly value of this key is used by Rails to generate Etag header. Let's look into source code to check what values is can take:

1 # gem activesupport - lib/activesupport/cache.rb
2 def retrieve_cache_key(key)
3   case
4   when key.respond_to?(:cache_key) then key.cache_key
5   when key.is_a?(Array)            then key.map { |element| retrieve_cache_key(element) }.to_param
6   when key.respond_to?(:to_a)      then retrieve_cache_key(key.to_a)
7   else                                  key.to_param
8   end.to_s
9 end

We have quite wide range of options here:

  • we can set an object here, that responds to cache_key message. All ActiveRecord objects have this method defined by default.
  • we can set Array of objects or the object that responds to to_a message
  • finally, if nothig match (for example when the key is a string), the to_param method will be used

If you are curious how the generated ETag value looks like, here is the example. For Book model cache key may look like this:

1 books/2-2014112812345
  • books - the name of the table for model
  • 2 - model id
  • 2014112812345 - timestamp from updated_at attribute by default

The params hash for these methods can also have public key set (by default it has false value). When it is set to true the reponses from our application can be cached by other devices (proxy caches).

The more concise form of these methods takes just object. If so, the object must response to cachekey and createdat methods.

What you should remember when you generate HTTP headers in the application?

The rule of thumb is: always think about all elements on the page that are changing. If the UI depends of them - they should be taken into account when you generate ETag and Last-Modified headers.

Page contains a form

When a page contains a form, you have to remember about authenticitytoken that is send with request when an user submits the form. This token is changing so have to pass it to etag option when we generate ETag. In a controller, you can use formauthenticity_token method to retrieve

1 def edit
2   @book = Book.find(params[:id])
3   fresh_when last_modified: @book.updated_at, 
4              etag: [ @book, form_authenticity_token ]
5 end

Pagination

Another frequent situation is pagination on a page. Generating ETag we have to take into account two things:

  • the amount of elements in a collection
  • the updated_at attribute for elements in the collection. In fact, we don't have to worry about every single object in the collection. The most important for us is the last element that was updated.
1 def index
2   @book = Book.order(:title).page(params[:page])
3 
4   count = Book.count
5   # remember to create index on update_at field
6   updated_at_max = Book.maximum(:updated_at).try(:utc).try(:to_s, :number)
7 
8   fresh_when etag: "books/all-#{count}-#{updated_at_max}"
9 end

Propagate updated_at to owning objects

Sometimes the state of a page doesn't depend on object state directly. Les't assume that the show page of the book, contains user's comments. The comment model looks like this:

1 class Comment < ActiveRecord::Base
2   belongs_to :book
3   belongs_to :user
4 end

When we create ETag for show page in the standard way:

1 def show
2   @book = Book.find(params[:id])
3   fresh_when etag: @book
4 end

it won't work properly. When a new comment will be created, the ETag will be still the same and the browser will get 304 status. We have to change Comment model:

1 class Comment < ActiveRecord::Base
2   belongs_to :book, touch: true
3   belongs_to :user, touch: true
4 end

The option touch causes that everytime a comment is created or updated, the updatedat attirbute on associated models is also updated. This way if a new comment is created, the updatedat attribute for book will change and the value of ETag and Last-Modified will also change.

Values in session

There are values that are not depenedent on updated_at attribute, but have an influence on our page. For example:

  • flash messages
  • current_user attributes
  • cookies

Fortunately, Rails can help to solve this problem. In contoller class we can use class method etag, which allows us to define global values to compose ETag.

1 class ApplicationController < ActionController::Base
2   etag { flash }
3   etag { current_user.try(:email) }
4 end

When you have many data in session and it will be hard to chose what takes to ETag, you can take the whole session:

1 class ApplicationController < ActionController::Base
2   etag { Hash[session] }
3 end

HTML or CSS changes

Whet you do in situation when nothing changed in your model, but HTML or CSS changed. Of course, you want the visitors to see the newest version of the page. How can you tell Rails to invalidate ETag header ? By default, when Rails generates ETag value it can add additional prefix to it. This prefix is a value of RAILSCACHEID or RAILSAPPVERSION environment variables. So everytime you want to invalidate etags, you can just change the values of this variables.

expires_in

Finally, let's see how we can set Cache-Control:max-age. We have a special method in controller to our disposal - expires_in:

1 def show
2   @book = Book.find(params[:id])
3   expires_in 10.minutes  
4 end

Summary

Rails helps us a lot to manage HTTP headers. It's definitely worth to use HTTP headers, even if you only depend on default behaviour of rack meddlewares.

When you start write in Ruby, sooner or later (rather sooner), you will meet with the concept of Proc and blocks. Especially the last one is something really popular in Ruby, so it's good to know what is this and why is it so useful. I think that there are many sources that can explain the concept of blocks, therefore I'm not going to write another article about basics of the blocks. For me the more interesting is the differences between Proc and blocks and how is it possible that you can write some methods like this:

def my_method(&block)
  block.call   
end

What happens when you execute such methods and why is this possible to give it as an argument block or Proc interchangeably? These are question that I will try to answer today.

Proc class

Let's do quick reminder: Proc is a class. To create and instance of that class, we call method new and as an argument we give block:

my_proc = Proc.new { puts "I'm Proc object" }

Exactly the same effect you get when you use proc method, since the method returns the instance of Proc object:

my_proc = proc   { puts "I'm Proc object" }

Now, when we have this instance of the Proc object we can send it the call message:

my_proc.call #=> "I'm Proc object"

This caused that the block was invoked. So you can imagine the Proc object as a box in which you can preserve block of code and exetute it later.

The differences between blocks and Proc'a

So we already know that Proc is a class and we can create an instance of it. Block on the other hand is not an object. We can't create any instance of it and we are not able to send any message to it. Moreover, we can't send it as an argument to a method, since methods can only take objects as arguments. Wait a minute. So how is it possible that we can call such method ?

['a','b','c'].map { |letter| letter.upcase }

Interesting, isn't it ? Let's investigate how the signature of the method looks like.

def map(&block)
end

Here we are our misterious operator &. It looks like this additional sign before argument causes that this is possible to send block as an argument, but how exactly does this work ?

&block

Let's start with an example of method:

def simple(&block)
  block.call
end  

simple { puts "I'm just a block" }

What really happens here is that Ruby in background triggers to_proc method on the block. As a results we get Proc instance. So inside method we do not operate on block any more, but we have Proc instance for our disposal. That's why we can send call message to block argument.

But this is not the whole story yet. In real world, our simple method can also take Proc instance as an argument as well.

my_proc = Proc.new { puts "I'm a proc" }   
simple(&my_proc)

In this case we use & operator in method calling and it's job is quite different here. simple method is waiting for a block, not a Proc instance. So in this case & operator does two jobs:

  • tells simple method that proc instance is serving as a block
  • calls to_proc method on my_proc. In case of Proc instance, this method just returns the instance itself.

&:upcase

Let's return to our previoud example:

['a','b','c'].map { |letter| letter.upcase }

We can get the same effect if we write:

['a','b','c'].map { |letter| letter.send(:upcase) }

or even more elegant:

['a','b','c'].map(&:upcase)

We just know that & operator is a wrapper for to_proc method. In this case the to_proc message is send to symbol, in our case this is :upcase. So let's see how the implementation of to_proc method migth look like, keeping in mind that this method should return a Proc instance.

class Symbol
  def to_proc
    Proc.new { |object| object.send(self) } 
  end
end

So simple, isn't it? :)

yield

Using yield statement is one another way to call a block. So we can create such method:

def simple
  yield
end

Then we can call it with any block:

simple { puts "Let's keep it simple" }

The rule here are the same. If we'd like to pass an Proc instance to the method, we have to remember about &, to tell method that we want to use Proc as a block.

my_proc = proc { puts "Let's keep it simple" }
simple &my_proc

If you use Solr in your Ruby on Rails project, there are a lot of chances that in some point you’ll need to implement autocomplete for searches. In this article I’ll show you how you can implement it. In fact, it is not so complicated. The trick is to change the Solr’s schema.xml correctly. I use ruby 1.9.3, rails 3.2.15 and sunspot_solr 2.0.0 (Solr 3).

Add fieldType to schema.xml

First of all we have to define new field types in schema.xml. Copy this code and paste it into section of schema.xml.

<fieldType name="autocomplete" class="solr.TextField" positionIncrementGap="100">
    <analyzer type="index">
      <tokenizer class="solr.KeywordTokenizerFactory"/>
      <filter class="solr.LowerCaseFilterFactory"/>
      <filter class="solr.EdgeNGramFilterFactory" minGramSize="1" maxGramSize="25" />
    </analyzer>
    <analyzer type="query">
      <tokenizer class="solr.KeywordTokenizerFactory"/>
      <filter class="solr.LowerCaseFilterFactory"/>
    </analyzer>
 </fieldType>

Set field class

Let’s analyze it. We add new fieldType, with name ‘autocomplete’. Every fieldType has to have unique name, it’s kind of identifier. Next we set the class for our field. For autocomplete we need text field, so this general, Solr class will meet our needs.

positionIncrementGap setting

Other setting is positionIncrementGap. This one is used to prevent phrase queries from matching the end of one value and the beginnig of the next value in multivalued fields. Let me give you an example to clarify why we want this setting. Suppose we have multivalued field “user”:

user John Smith user Ann Maybe

With a positionIncrementGap of 0, a phrase query of “smith ann” would be a match. Well, we don’t want a match across many value fields. So to prevent that we set positionIncrementGap which sets virtual space between the last token of one field instance and the first token of the next instance.

Index analyzer

Analyzers tell Solr how field should be analyze during indexing and quering phrase. For indexing we need as a tokenizer KeywordTokenizerFactory (tokenizers describe how the text will be divided into separated tokens). This one treats the entire field as a single token, regardless of its content. For example: ‘John Doe’ will be treat as ‘John Doe’ value during matching, not ‘John’ and ‘Doe’ separately.

Next we set two filters:

  • LowerCaseFilterFactory – it lowercases the letters in each token
  • EdgeNGramFilterFactory – by default, create n-grams from the beginning edge of a input token. This is an description from official doc. Let me give you an example. We have field with value ‘developer’. With setting:
<filter class="solr.EdgeNGramFilterFactory" minGramSize="3" maxGramSize="25" />

the string ‘developer’ will be broken into terms: ‘dev’, ‘deve’, ‘devel’, ‘develo’, ‘develop’, ‘develope’, ‘developer’. This is exactly what we want for autocomplete purpose.

Query analyzer

This analyzer tells Solr how to parse user query. So we treat the query as single value (tokenizer KeywordTokenizerFactory) and we lowercase it before matching (filter LowerCaseFilterFactory).

<dynamicField name="*_ac" type="autocomplete" indexed="true"  stored="true"/>

This is dynamic field as we want to have more than one field of this type. Any field with postfix ‘_ac’ will be autocomplete. We also want to set this kind of field as indexed (it means user can use this field to search) and stored (we want to show this field in search results).

Set up model

Now we can set up our model. Let’s say we have model Post and title field will be autocomplete type:

class Post < ActiveRecord::Base
  searchable do
    text :title_autocomplete, as: title_ac { title }
  end
end

Now run rake sunspot:solr:reindex to reindex Solr.

Then in model Post:

Post.search do
  fulltext params[:q] do
     fields(:title_autocomplete)
  end
end

where params[:q] is user query.

JavaScript is great but sometimes it’s really annoying because it’s lack simple, built-in functions. Let’s say we have an array of the integers:

var arr = [2, 10, 30, 7, 4];

and we want to get the highest value from the array. We can of course iterate the array and check each value:

var len = arr.length,
max = 0; 

for(var i=0; i<len; i++){ 
  if(arr[i] > max) {
    max = arr[i]
  } 
};

but it’s so much code!

So to do it in more subtle way, let’s do it in only one line of code:

Math.max.apply(Math, arr)

In JavaScript we have built-in object Math, which has a method max. This method does what it should be: count the highest value for the arguments list. The problem is that we can’t give it as an argument the array. So this will be working:

Math.max(2, 10, 30, 7, 4) // 30

but this won’t:

Math.max([2, 10, 30, 7, 4]) // NaN

So to get it around we can use apply method. Every function in JavaScript has this method built-in. It allows as to invoke function in given context with array of arguments. It’s exactly what we need here. We give as a context Math object but we can also do something like this and our example will still works:

Math.max.apply(null, arr)

‘self’ in Ruby is really important conception, one of this: if you understand it, your Ruby-journey will be much more fun and aware. self in Ruby program means current object or default object. When your program is running, at every point of it there could be only one object that are accessible via self. If you want to know what self is in particular part of the program, you must know the context you’re in. For example, self is different inside class definition and inside instance method. Let’s write very basic example and see, what self means in the different context:

puts "We are in top level context: #{self}"

class Test
  puts "We are in class context: #{self}"

  def self.some_class_method
    puts "We are in class method: #{self}"
  end

  def some_instance_method
    puts "We are in instance method: #{self}"
  end
end

Test.some_class_method

t = Test.new
t.some_instance_method

Top level context

When you run the above example, you can see that outside of any class or method self is main object. What is main? Outside class or method Ruby give us default self object. Main is a special term that the default self object uses internally to refer to itself. Internally means that you can’t refer to main directly. So if you try to do something like this:

puts "#{main}"

you’ll get an error as Ruby will treat main as an regular variable and try to find it.

Class and module context

When your program is inside class or module definition, the self meaning changes (see second and third puts invocation in the above example). In this context self means class or module object. Let’s see another example to understand it right:

class OutsideClass

  puts "self means: #{self}"

  module InnerModule
    puts "self means: #{self}"
  end

  puts "self means: #{self}"

end

When you run the program, you get:

self means: OutsideClass
self means: OutsideClass::InnerModule
self means: OutsideClass

As we can see inside class, self is class object (in our example this is OutsideClass) but when program reaches module the self switch into InnerModule object.

Class method context

Inside class method:

class SomeClass

  def self.some_method
    puts "self means: #{self}"
  end

end

SomeClass.some_method 

#=>self means: SomeClass

self is also class object (in our example SomeClass object).

Instance method context

Let’s see how situation looks like when program runs inside instance method. To check this we have to send message to the method (call the method).

class SomeClass
  def some_method
    puts "self means: #{self}"
  end
end  

#=> self means #<C:0x007fbaf410b678>

This a little strange entry means that inside instance method self is the instance of the object. In the example above self is the instance of the SomeClass class.

Singleton method context

The last example is about singleton method defined directly on the object. Let’s see how we can create such method:

some_obj = Object.new

def some_obj.some_method
  puts "self means: #{self}"
end

some_obj.some_method

As you can see for singleton method self means also the instance of the object. However, this time this is the instance of the object on which the method was defined.

Know better your instance variable

Knowing what self means in different place in a program can help you to better understand the instance variables. The rule is simple here: every variable in the Ruby program belongs to the object which is the current object (self) at that point of the program. Let’s see that example:

class SomeClass

  def some_method
    @var = 'I belongs to object instance'
    puts @var
  end

  @var = 'I belongs to class object'

end

c = SomeClass.new
c.some_method

The example above prints out:

I belongs to object instance

So inside the method, instance variable belongs to SomeClass instance object. Instance variable inside the instance method and instance variable in the class context are entirely different variables. So they can live in our program independently.